Create an event
Everything you do before registration opens, in the order you will do it. Then share it, edit it, and archive it when it is over.
The Events list
Every event in your organization, with the next one first.
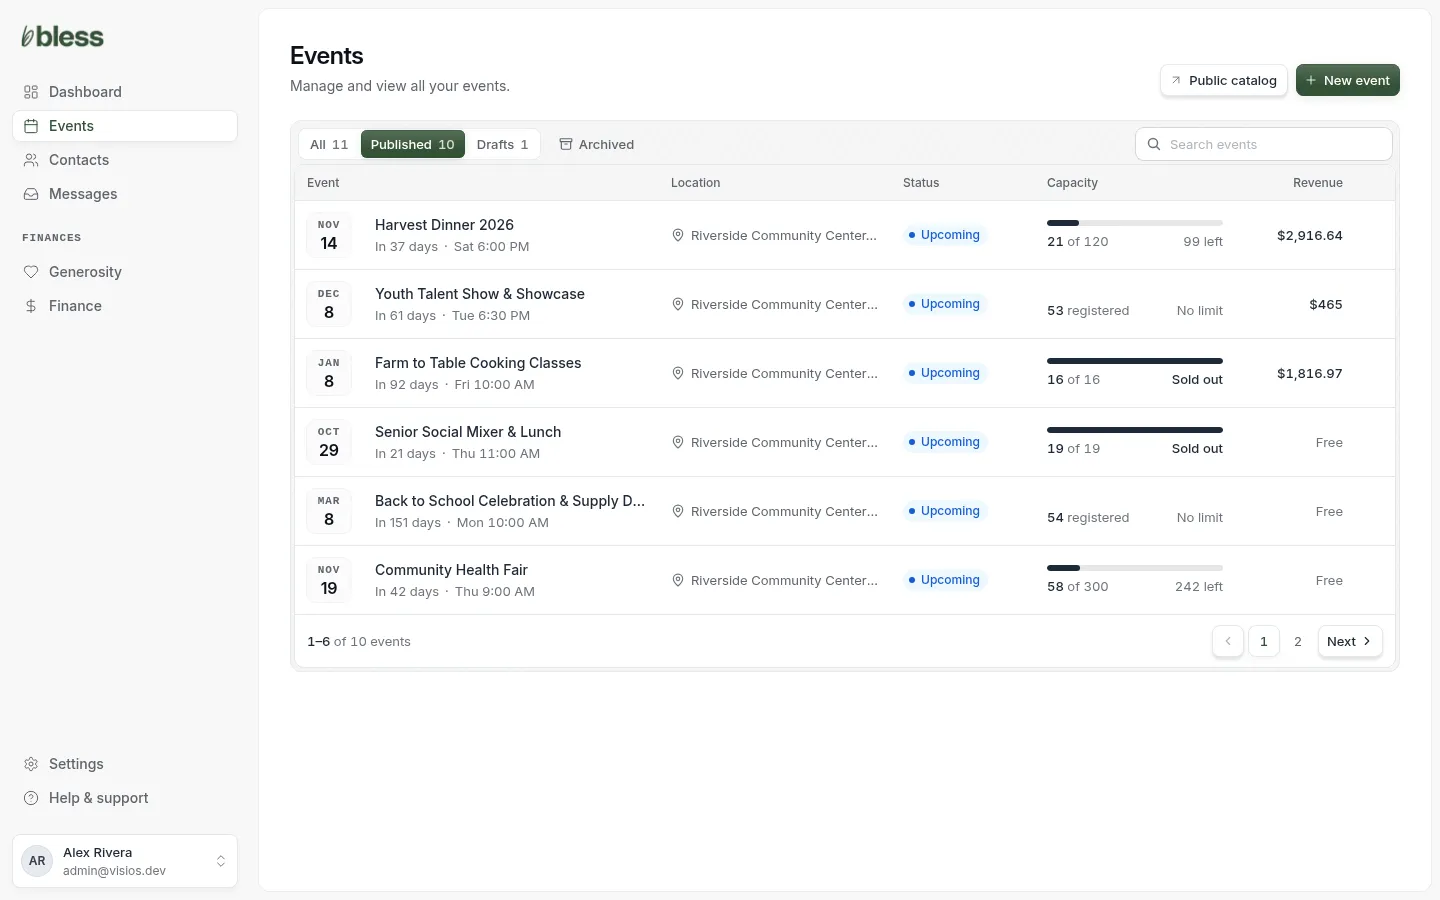
- Open Events in the sidebar.
- Use All, Published and Drafts to filter the list, or search by name.
- Read each row. It shows the date, the place, the status, how full the event is and the money received.
- Open an event, or press New event.
The status is Draft, Upcoming, Happening now or Completed. Archived shows events you put away. Public catalog opens the page where guests see all your public events.
Create an event
A new event takes five steps. Bless saves a draft at every step, so you can stop and come back.
- Save & exit keeps the draft and takes you back to Events.
- Delete draft deletes the event for good.
- A red dot on a step tells you that the step needs something before you publish.
Step 1: About your event
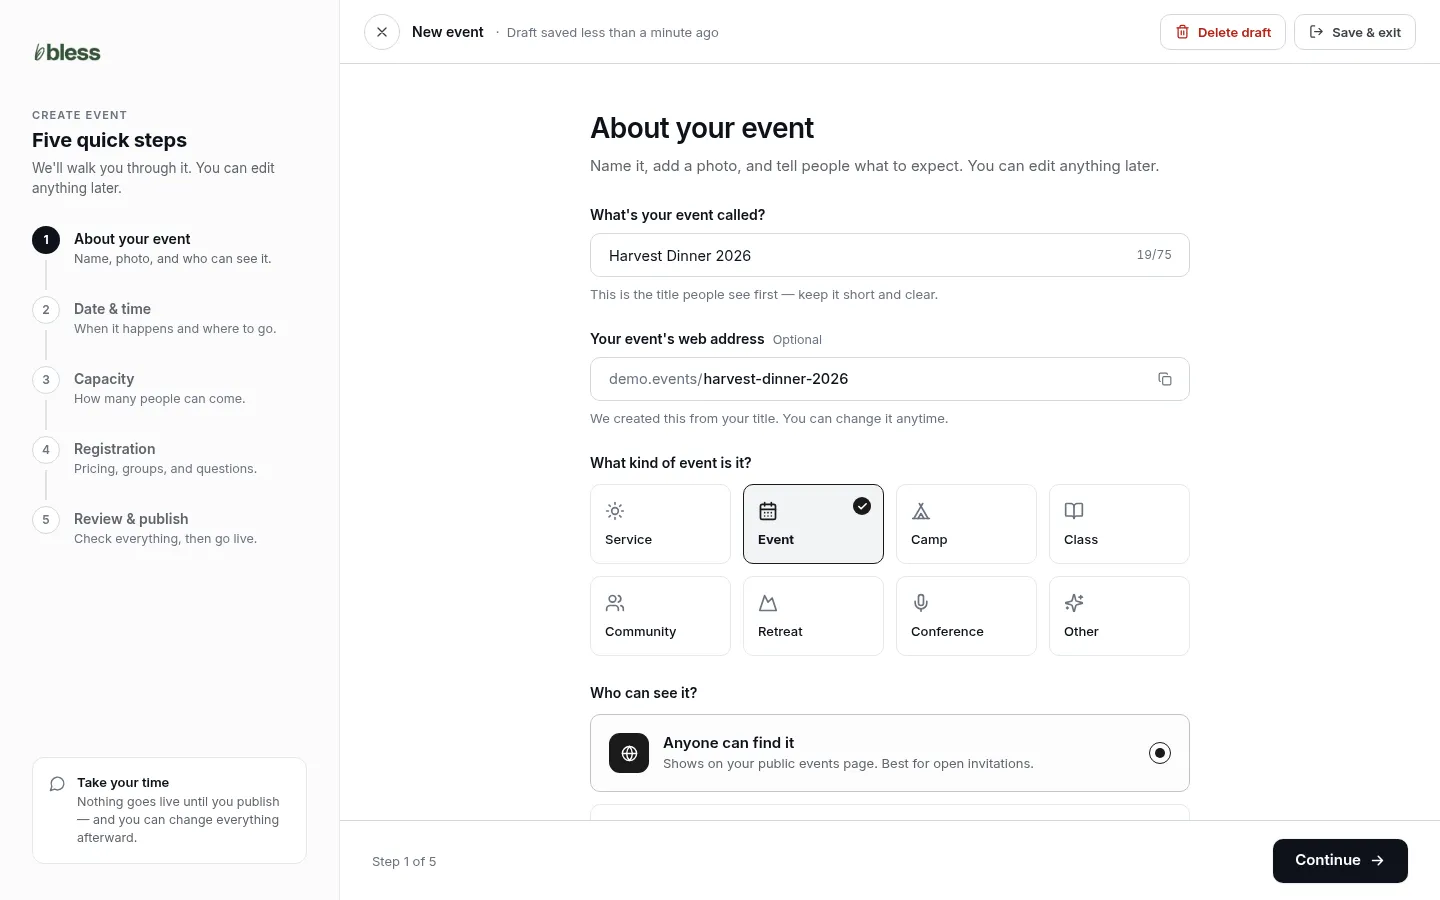
- Type the event’s name. Keep it short. Guests see it first.
- Check the web address. Bless makes it from the name, and you can change it.
- Choose what kind of event it is.
- Choose who can see it:
- Anyone can find it puts the event on your public events page.
- Invite only hides it. Only people with the link can register.
- Add a cover photo. A wide (16:9) JPG or PNG looks best.
- Describe the event. Guests read this under About.
- Press Continue.
Step 2: Date & time
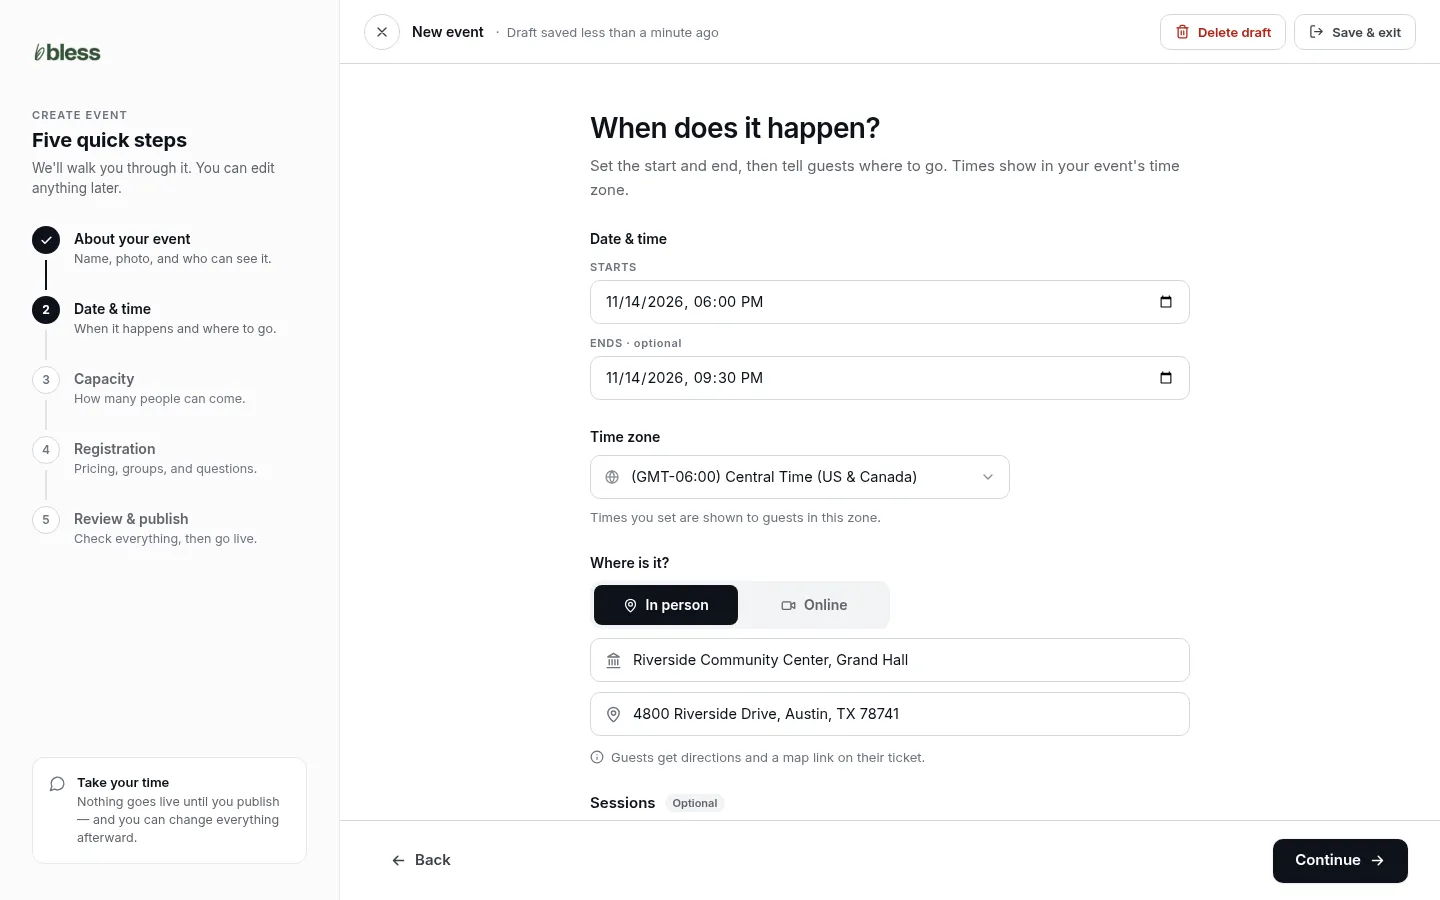
- Set when the event starts. The end is optional.
- Check the time zone. Guests see times in this zone.
- Choose where it is:
- Saved venue lists the places you saved in Settings.
- In person asks for a venue name and an address.
- Online asks for a meeting link.
- Add sessions if the event has parts, such as a reception and a dinner. Press Add session for each one.
- Press Continue.
Guests get directions and a map link on their ticket. If you add sessions, check-in can count each session on its own.
Step 3: Capacity
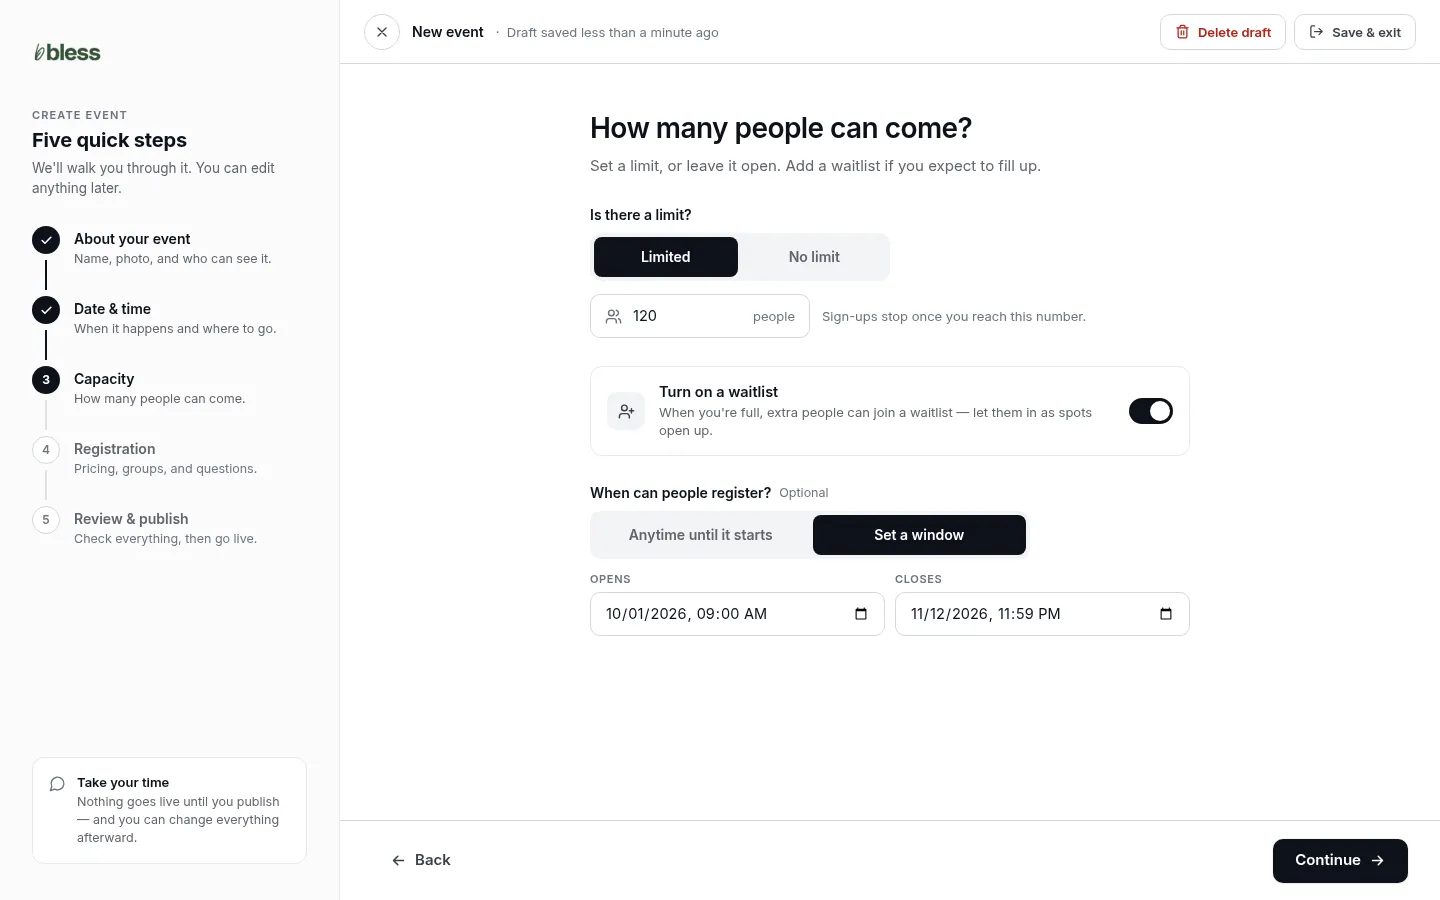
- Choose Limited and type the most people who can come, or choose No limit.
- Turn on Turn on a waitlist if you expect to fill up.
- Choose when people can register:
- Anytime until it starts is the usual choice.
- Set a window lets you set when registration opens and closes.
- Press Continue.
Registration stops when the event is full. If the waitlist is on, guests can then join the waitlist. Every seat in a table counts, even a seat with no name yet. Add-ons do not count.
Step 4: Registration
What guests can buy. Leave the price blank to make a registration free.
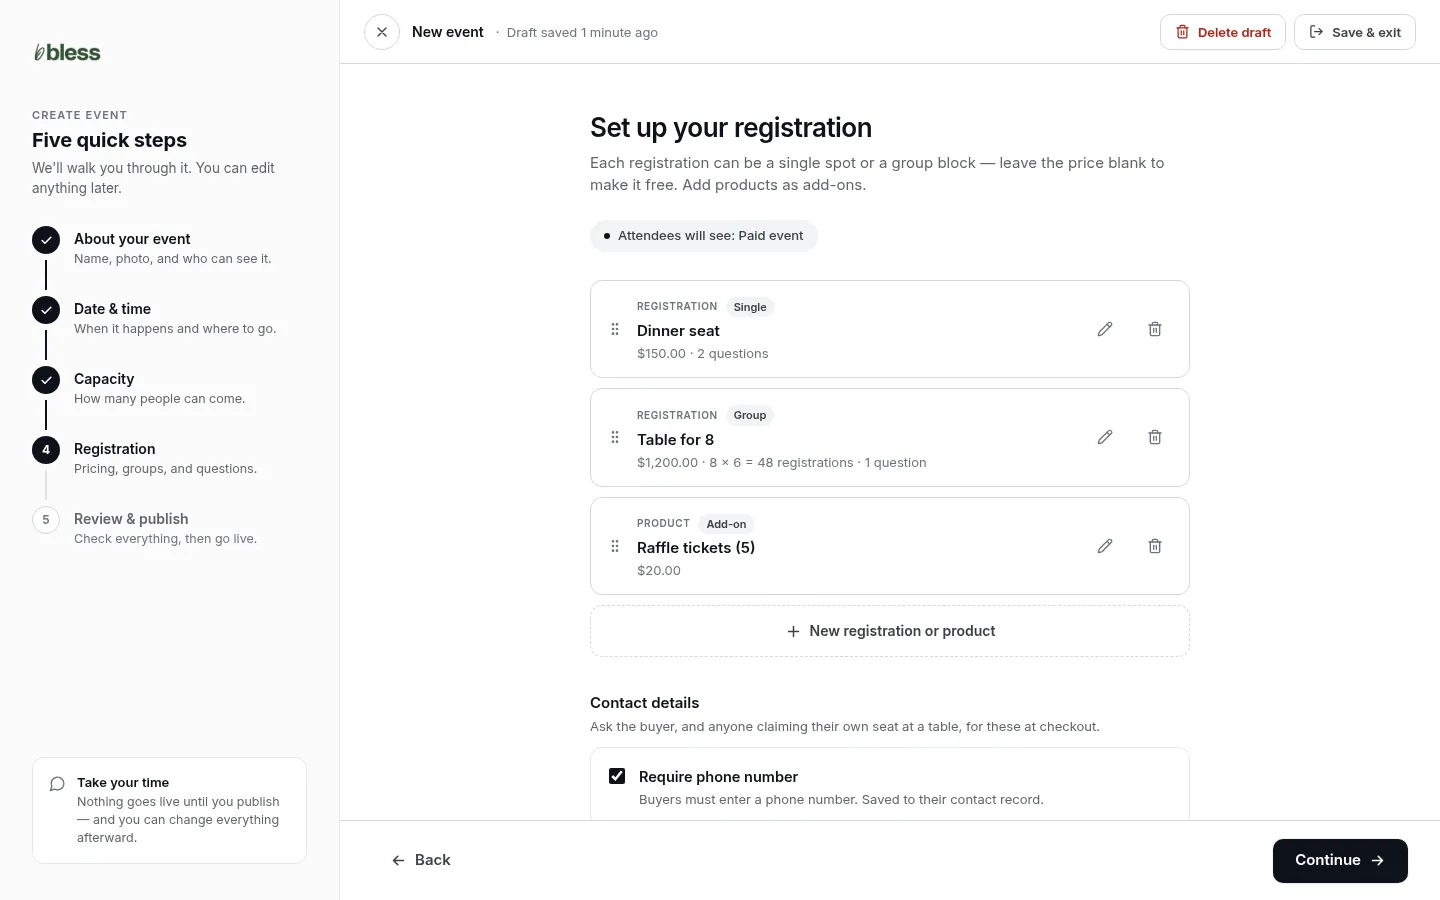
- Press New registration or product.
- Choose what to add.
- Fill in the details and the questions, then press Add registration.
- Add more until the list is complete. Drag the rows to put them in order.
- Under Contact details, tick Require phone number or Require mailing address if you need them.
- Press Continue.
The line at the top tells you what guests will see: a free event, a paid event, or a mix.
Choose what to add
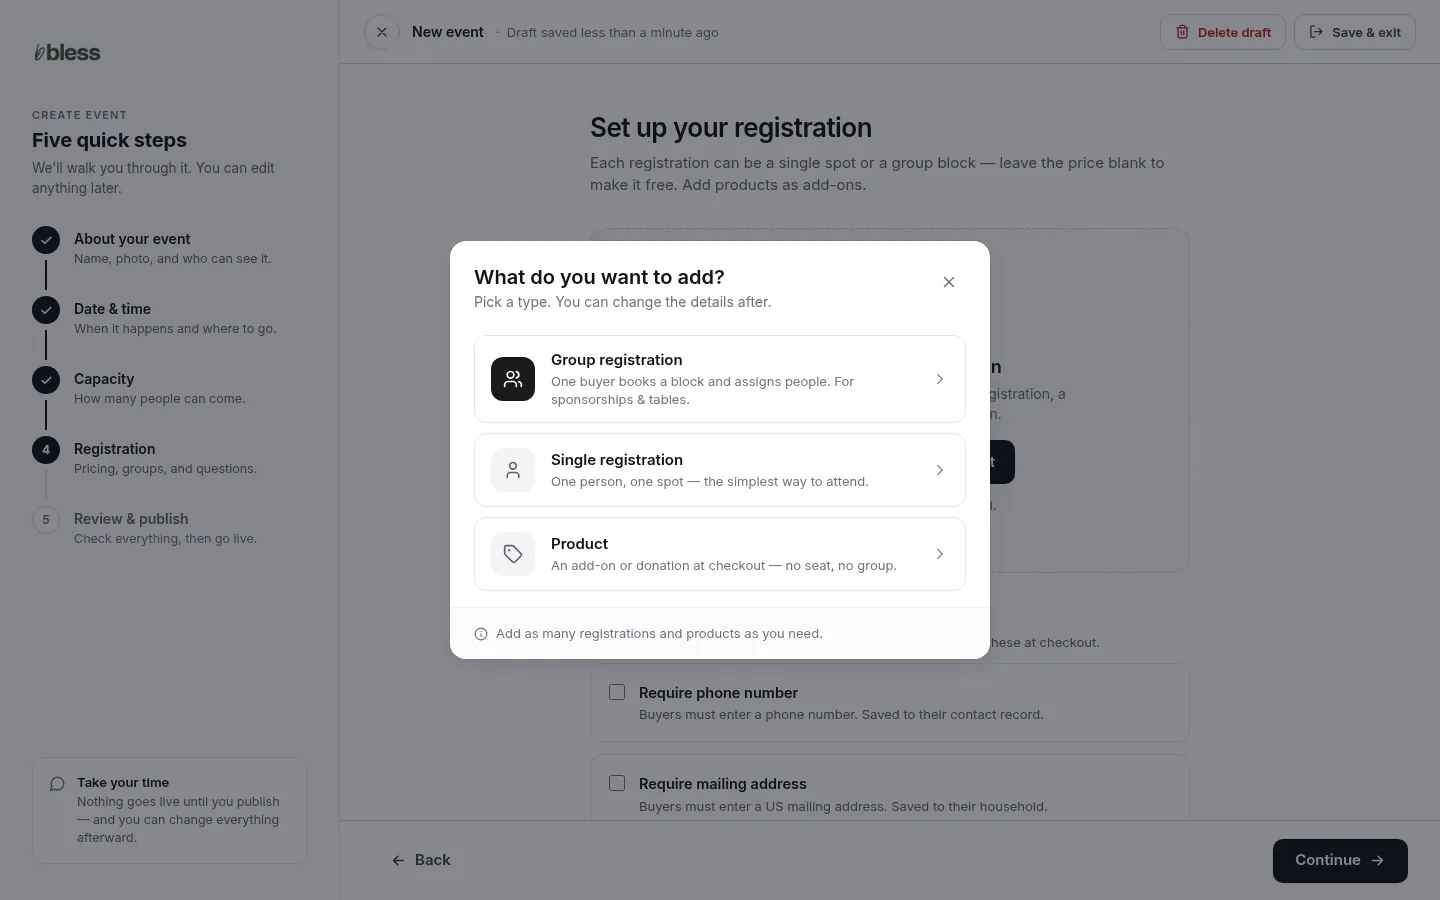
- Single registration is one person and one spot. Most events need only this.
- Group registration is a block of seats for one buyer, such as a table for 8. Use it for tables and sponsors.
- Product is an add-on or a gift at checkout. It has no seat.
A single registration
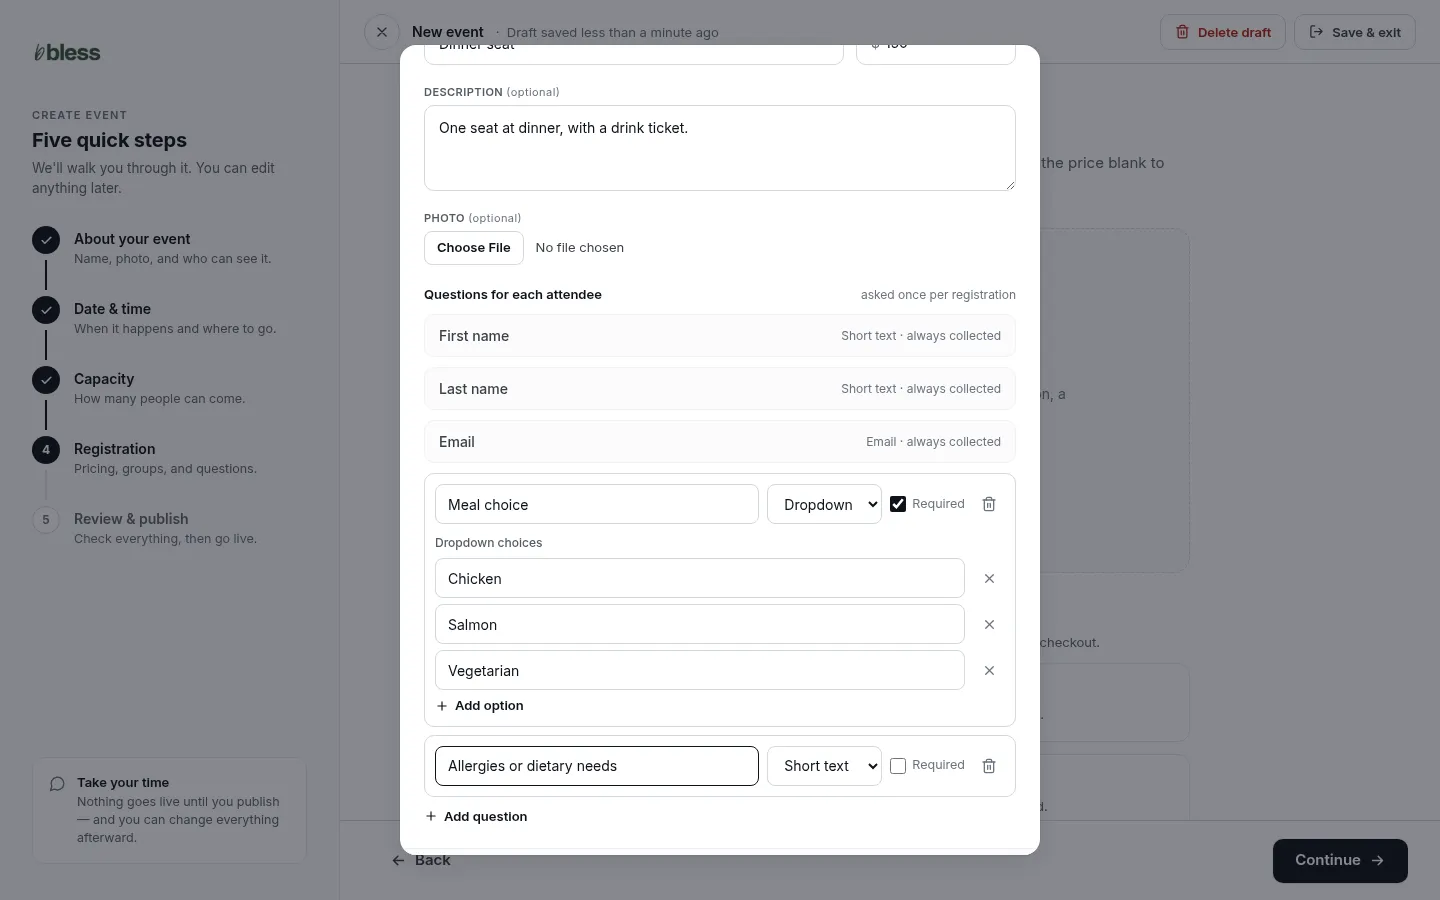
- Type the name and the price.
- Add a description and a photo if they help guests choose.
- Press Add question for each thing you need to know about each attendee.
- Choose the type of answer: Short text, Long text, Dropdown, Checkbox or Number.
- Tick Required if every attendee must answer.
- For a dropdown, type each choice. Press Add option for another.
Bless always asks for first name, last name and email. You do not need to add them.
A group registration
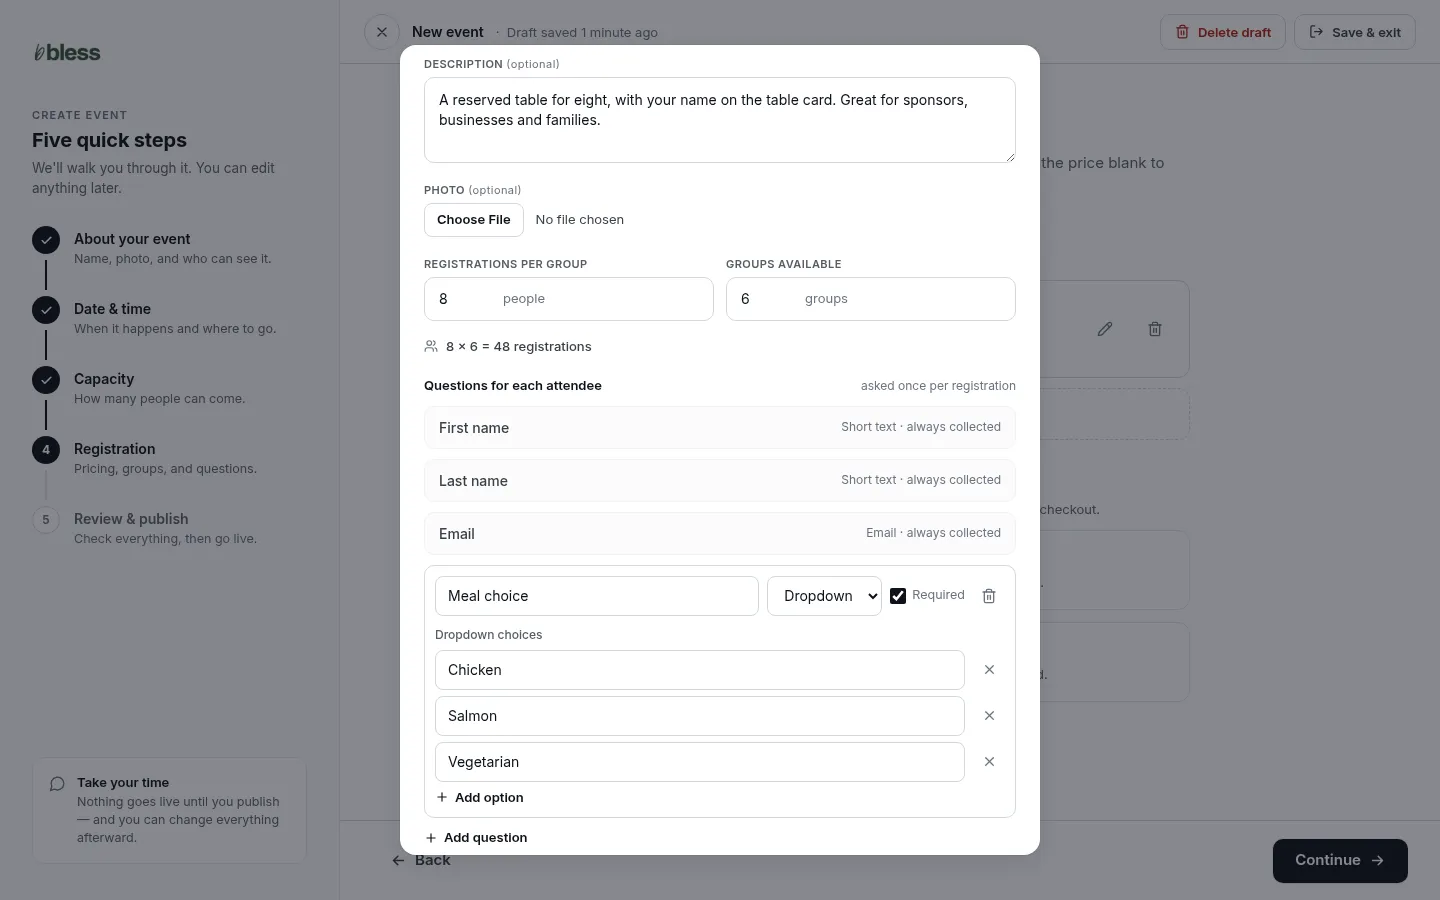
- Type the name and the price of the whole group.
- Set Registrations per group. This is the number of seats, such as 8.
- Set Groups available. This is how many groups you sell, such as 6 tables.
- Add the questions for each seat.
The line under the numbers shows the total seats, such as “8 × 6 = 48 registrations”. See Groups and tables for what happens after a group sells.
Step 5: Review & publish
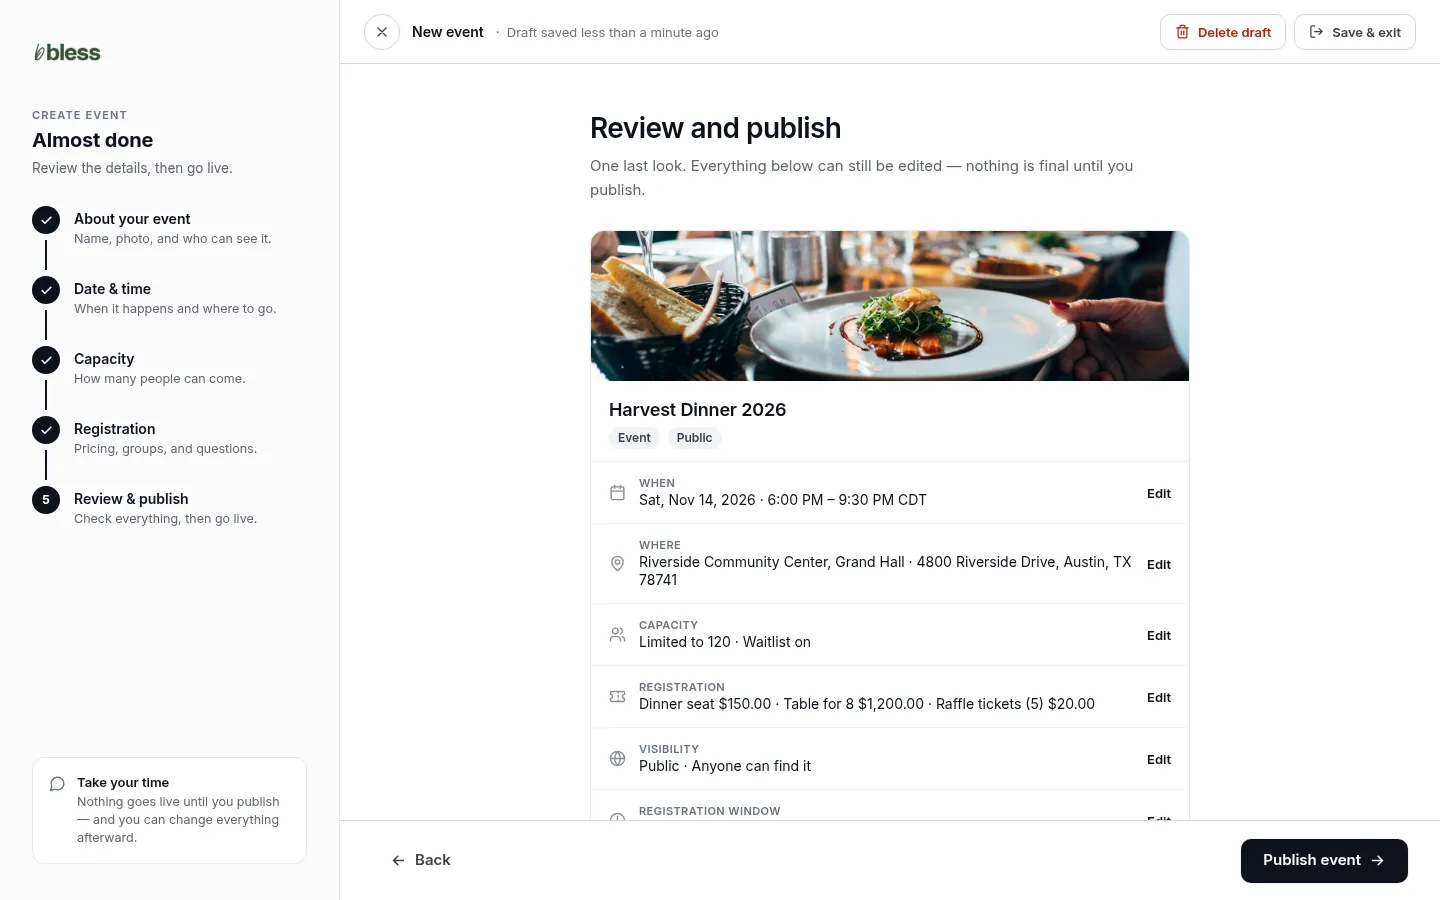
- Read any item under Finish these before publishing. Each one tells you what is missing.
- Read each row. Edit takes you back to that step.
- Press Publish event.
You see “Your event is live.” and the event page opens. To publish, an event needs a name, a type, a start date and time, a place and at least one registration.
Share the event
Open the event and press Event actions.
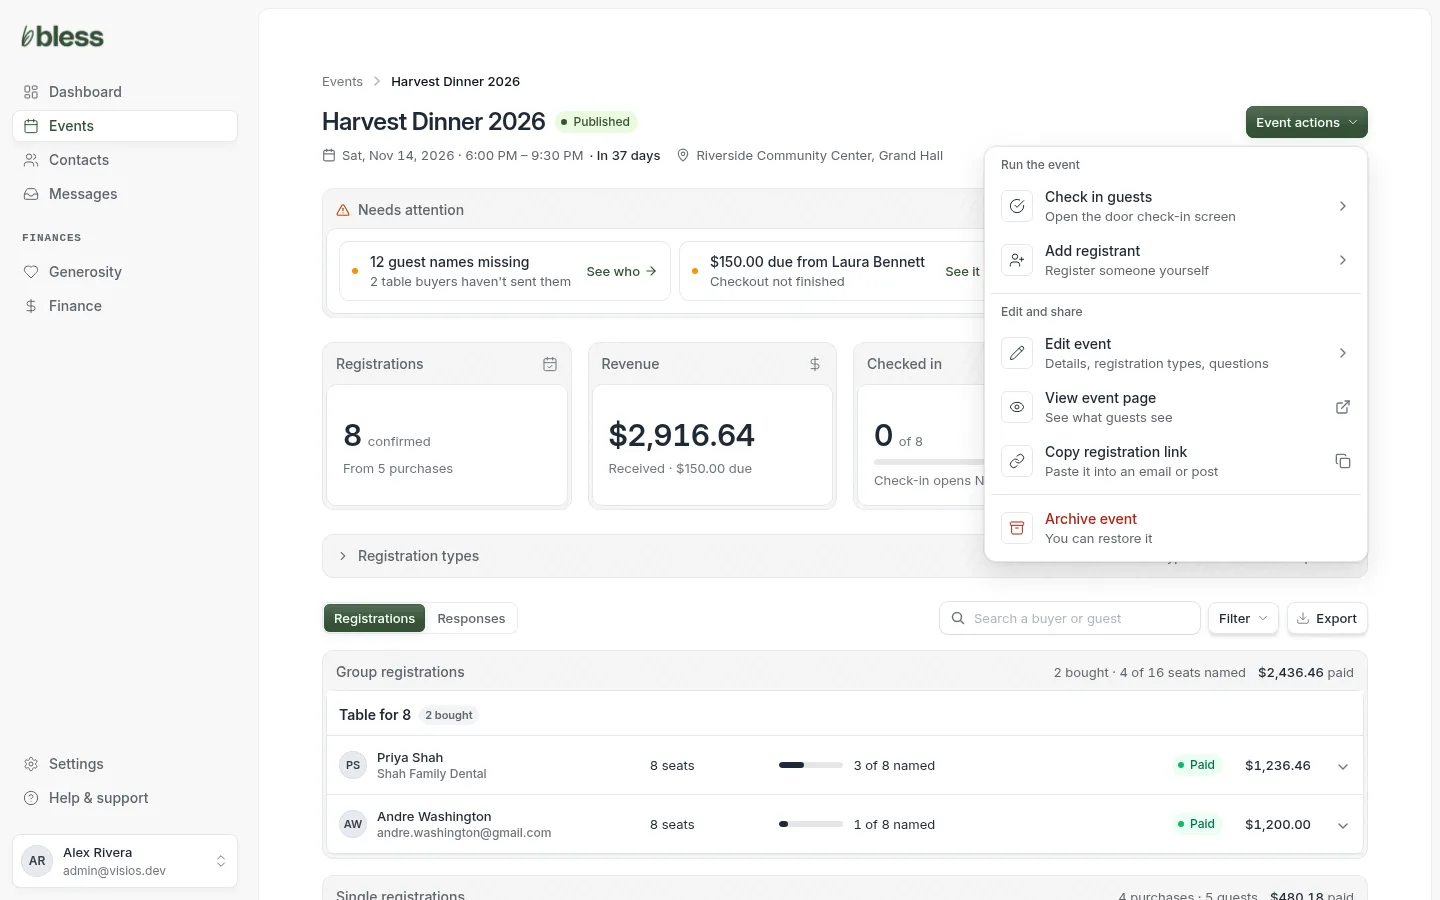
- Copy registration link copies the event’s address. Paste it into an email or a post.
- View event page opens the page guests see.
- Check in guests opens the door screen. See Check guests in.
- Add registrant registers someone yourself. See Add a registrant.
An event set to Invite only does not show on your public page. Only people with the link can register.
Edit an event
- Open the event and press Event actions.
- Press Edit event. The same five steps open.
- Make your change.
- On the last step, press Save changes.
You can change anything after you publish. Bless does not let you remove a registration type that has attendees. Cancel their registrations first. A published event must keep at least one registration type.
Archive or delete
- Delete draft deletes a draft for good. You see it in Event actions on a draft.
- Archive event moves a published event to Archived. Its registrations and orders stay. Press Restore event to bring it back.
If you sent an announcement to the people registered for a draft, Bless archives the draft instead of deleting it.
Updated
Was this page helpful?
Thank you. Your answer helps us make these pages better.